Monday, May 27, 2013

HMS Race Horse Build Log - Day 23

Day 23 - 10 Hours Work

I was tidying up all my ship stuffs after working it one night, and when I digged out all stuffs at the bottom of the box of my kit, and OMG!!! I found one thing that I've totally forgotten.. The Bell!! 

Bell & Belfry
So, quickly I searched through the net for examples of belfry as references.. and this is what I've made!! :)

Belfry
The columns are those leftovers from my beloved Pearl. Two 1mm thick of maple strips  (leftover from 1st layer hull planking) are stacked up, and then another strip as bridge to hold them together. :) And, the shaft is made from fuse wire.. thin enough to cross through the crown of the bell.

Well, the flat head really doesn't look good.. So, I added a 'hat' for it! It is made of 3 * 1mm thick maple strips, and beveled at both ends. And, the shaft is painted to black.

Belfry After Staining

Now, where should I place it??? Hmm... normally it should be at the main deck, but my main deck is currently tightly occupied.. but putting it on poop or front deck looks weird..
Anyway, here's a shot of how it's look like on deck! :)

Belfry on Deck

Err... any comment on the position?? :P it really looks tight there! :D

Light & Lantern
As previously mentioned, I am still waiting for my LEDs to arrive.. however, I actually already bought 'lamp' to light up my cabin but it's just not bright enough.. That's why I'll need to buy LEDs to replace it.. and IT's tritium!

The main reason I wanted to use tritium to light up my ship is because of its durability, in which it is able to light up for 25 years!!! You just have no idea whether you'll be able to see it goes off alive!! :D In case you never heard of tritium: it is quite frequently used in military purposes, for example night vision on weapons; while for household application,  watches. 

Tritium Vials

Tritium is costly. I bought 10 of them, and it cost me nearly USD$100!!! 
OK, back to the ship... :P So, I tested it at night with all the light in my room turned off and taken this shot..

Light From the Cabin

3 vials are placed RIGHT surrounding each window, in this case 6 vials are already used for the side windows, and there won't be enough for the stern ones (3 windows). This shot is taken in long exposure of 30s, and I swiped my phone flash over the ship during the exposure. 

OK, the result here looks kinda satisfying but it's really different in real life. The light is already not noticeable from 3m distance, without any presence of other light source in the same room!! Moreover, 3 vials for each window is just so not worth doing, that's why I changed my mind to replace them with LEDs.

So, instead of wasting them, I planned to make them lanterns on deck! :)

Lantern's Head and Base Cut Off

Again, by using the column from my Pearl, I cut off the head and base of the column as the head and base of my lantern. :) I then drilled a 1.5mm diameter (diameter of the tritium vial) of hole on both the head and foot, and pinned 4 more holes at the 4 corners of the foot. These 4 small holes will be where the columns of lantern set, like this:

Lantern of Tritium Vial

The eye on top is made by the thinnest fuse wire. 

The first one really took me some times until I came up with this idea, and my patience just allowed me to make another 2 on the same day. :P

The Three Brothers

How it's look at night.

Lanterns At Night

Brightness Comparison
Here you can see the brightness comparison of tritium with my laptop's notification lights..


-End of Day 23-

Sunday, May 26, 2013

HMS Race Horse Build Log - Day 15 to 22

Day 15 to 22 - 12 Hours Work

It has been a while since the last post.. I was working on all the deck fittings besides the poop deck because I'll need to wait for my LED to arrive before I can start..

Windows
2 holes are cutted out, and the windows frames are added so that viewer able to see the interior through it.
Side Windows

Seeing Through

The upper half is painted Navy Blue too.
The same steps are carried on on the stern windows.

Gratings
I purchased extra gratings to fill up the empty space on my ship, it is set as the same size as the bombard base.
Gratings

Frame

Frame is also added with leftover walnut planks. the 'drain racks' at both side will hold the bombard shots!! :)

I've also made another 4 racks to put them besides the 2 bombards!

Rudder
Rudder with rudder hinges fitted. I did not hammer the nails, instead I used a long nose plier to push them in.

Rudder with Hinges

Bits & Pin Racks
This is the worst part of the week! 
In the beginning, I thought all the bits will be provided by the kit, carved and done!! Not until when I read the instruction of making all these bits... So, what the kit actually provide on this part is just a 500 *4 *4mm walnut strip!!

Making these really breaking  my limit...
Belaying Pin Racks

Parapet Bits

All of 4*4mm Walnut
As you can see here, there are parapet bits, pin racks, ladders and cat heads.. Some of them are not shot..
It's really time consuming... 
Patience testing at its finest!!

Metal Blackening & Bombards
This is my first time doing metal blackening, and it was fun!! :)
I used Blacken-it Metal Blackener as my solution, and it worked quite well!!

I made a mixture of 50 water and 50 solution.. hot and boiling water!! That's it!! :D
Hot water really help quickening the process, you can get an obvious result within a minute!! 
Before

In Progress

After!!
Yea.. the 2nd picture you're seeing right now is the result after 30 seconds!! Anyway, I still let them there for around an hour or a half. 

I actually did it twice, because the first attempt did not give a very satisfying result (rusty feel). On my second attempt, I made mixture of 40 water, 60 solution, and the 3rd pic is the result I get. :)

Bombard Completed

Hatch
The hatches at the poop deck.. I added nails as door knobs. 
Hatches

With all these deck fittings done, I can finally put them on my ship.. It's how it looks now!!

Deck Fittings Done

Bombards with Shots

Again, the poop deck is not glued yet, I just put them on for few shots.. still waiting my LEDs to arrive.


-End-

Sunday, May 12, 2013

HMS Race Horse Build Log - Day 14

Day 14 - 7 Hours Work


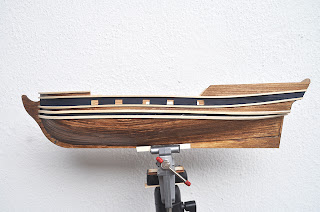
The wood strips of handrails and wales are thicker, 2mm.. so, there's no way to glue it to the hull without 'pre-bending' first. This is how I bend them! :)
 
DIY Wood Bender

I rinsed them into boiled water for around 10 minutes, just to make sure they will be soft enough bend. 

The Next Day
I got my acrylic paint from my church!! :D I borrowed blue and black to make desirable Navy Blue! It took me sometimes... 


Tape to Avoid Crossing Border


Result after 7 hours!!! Setting the wales really time consuming..

Starboard

Port
If you look closely, you can see that I've overdone the lower stripe to black.. :P

Bow

-End of Day 14-

HMS Race Horse Build Log - Day 13

Day 13 - 7 Hours Work

Following up the previous staining issue.. I've finally decided to re-sand the hull and stain again. Well, it is not so satisfying but already improved compared to the previous one..

Before Fixing

Obvious defects can be seen at the especially at the bow side before I start fixing.. After re-sanding and staining, all major defects are covered. :)

Port

Starboard

Bow

While waiting the stain to dry, I continued on the deck planking.
Same method as the hull planking is used, I scribed one side of the woods using an 8B pencil to give better details.

Deck Planking
Top View

The poop deck is not set yet, I just put it up for photoshooting. It's not done so because I'll still need to add light to it..

Treenails are also added using mechanical pencil, and finally a natural stain on it to provide protection.

Treenail

Now the Bulwark.. I will need to cut the gun ports out before I can apply colour on it. I transferred the distance between gunports from the full scale plan provided, mark them on a piece of long cardboard to get better accuracy.

Bulwark's Gunports

I drilled around 4-6 holes at both sides first, to help cutting them out.

Gunports


- End of Day 13 -

Monday, May 6, 2013

HMS Race Horse Build Log - Day 12

Day 12 - 5 Hours Work

No too big issue here on the 2nd layer planking, since I was just following the 1st layer.. :)

Anyway, I think that I forced the wood strip a bit and caused a 'flaw' at the middle part..

Port Side (A Flaw Can Be Seen at the Middle)

I also scribed the wood strips using a 8B pencil, that's why you can see obvious black between woods. :)

Stem

Starboard

Here you can see the flaw more obvious from the picture below..
Anyway, comparing to the full scale plan.. the wale will just cover it! :)

Wale Will Cover That Flaw

After sanding with 320 and 600 grit, I then continued on staining my ship. I bought a Dark Walnut, and a clear gloss stain in order to get my desirable color.. As shown in picture below, from top to bottom: Dark Walnut, 50/50 Mix of Dark Walnut + Clear Gloss, Clear Gloss.

Second One as My Ship's Colour

I chose the 2nd one as my ship's stain colour, which look pretty similar as the picture on the box... anyway, a nightmare began!!

When I swiped my brush across my ship, some portion just didn't 'bite' the stain!! And cause all these big freckles on it.. I'm still finding way to solve it..

'Unabsorbed' Stain


- End of Day 12 -